|
Orders
Include application Squeegee and Decal Zone Decal.
Measuring For Decals
Measuring for Decals is not
difficult, but it does take a bit of common sense. When we refer to overall area,
this refers to the imaginary rectangular area that surrounds the particular group
of letters you are measuring for. Here are some examples of measurements of overall
area:

When
you select an overall area, we will make your decal as big as possible, while
still making it fit within the overall area selected. Due to the unlimited possibilities
of what you can create, your decal might not fill the entire box. For example,
a decal size listed as 12" x 12" might actually measure to 12"
x 10.5". We try to come as close as possible to the stated size, but there
are cases of slight variance. Sometimes,
you might need to include a minor obstruction within the overall area, but make
sure it will fall in a spot that won’t interfere with the lettering. Please
be aware that doing so might require the decal to be modified before installation.
For instance, you can always separate lines or individual letters of a decal before
application if you wish. 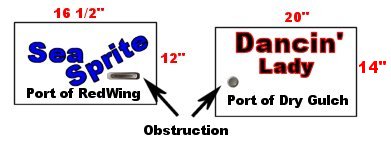
Measuring
for Hood Protector Lettering, Decal
Clip Art, and Windshield Lettering.
When ordering these Decals, you will be asked for the overall size of decal. Measure
an unobstructed area of the installation surface that will accommodate the closest
size that we offer.
Measuring
for Semi Decals, Race
Car Decals, and Miscellaneous Single Line Decals.
When
ordering these Decals, you will be asked for a letter height, and a maximum line
length. The program won’t let you enter more lettering than will fit within
that length. Decal
Facts
Our Materials: Premium
2 mil outdoor cast Vinyl:
The majority of our Vinyl is Premium 2 mil Outdoor Grade. We don't use any “intermediate”
or “economy” grade vinyls for vinyl cut decals. We have many years of
Vinyl production and installation experience, and we can tell you that the slight
savings definitely aren’t worth it in the long run. Most of our Vinyl is
“rated” for 7 years. This means that the manufacturer says under normal
conditions, the material should not peel, crack, delaminate, or fade for 7 years.
As a matter of fact, in most cases, the material considerably outlives this rating.
There are certain instances when, due to manufacturing limitations, we must print
on an intermediate 4 mil vinyl. These are mainly our flag and patriotic decals.
These decals also carry our 2 year warranty.
All of our decals will work fine
in marine applications.
This is only a rating, and should not be mistaken as
a warranty. Our Reflective Vinyl is all Scotchlite 680 Series Reflective.
Vinyl
Colors:
It is impossible to get “web safe” computer screen colors to properly
match all the colors of our Vinyl. As you may already know, the actual Vinyl colors
are far more vibrant than what you see on the screen. We can send you a Printed
Vinyl Color Guide at no charge. Our
Warranty:
Our Decals carry a 2-year guarantee. This covers peeling, cracking, delamination,
and fading. All sales are final, with the exception of warranty problems, which
we will happily replace with identically ordered product within the 2 year warranty
period. We do not issue any cash refunds. Limitations
of Warranty:
We will only warranty decals that have
been determined to come from a defective lot of material. All other adhesion or
installation related problems are assumed to be the fault of improper conditions
or other installer related error. We will not take back half- installed decals,
so please inspect your order carefully upon arrival. WE TAKE NO RESPONSIBILITY
for any damage to surfaces as a result of installation or removal of our products. Decal
Returns:
To return a Decal you must obtain a Return Good Authorization Number. You can
obtain a number by calling our Online Purchase Assistance number toll free at
1-877-813-9663
General
Vinyl Application Instructions:
Skill
Level of Installer
A handy person with proper instructions can install moderately sized Vinyl Decals.
When installing decals larger than truck door- sized, it is suggested that an
adequately experienced person do the installation. Please keep in mind that we
will only warranty decals that have been determined to come from a defective lot
of material. All other adhesion or installation related problems are assumed to
be the fault of improper conditions or other installer related error. We strongly
suggest you wait at least 60 days after painting a surface before applying any
decal, because should you ever wish to remove the decal the paint will come off
with it if the paint is not properly cured before application.
Learn the Terms.
Each Decal at the time of purchase consists of 3 parts:
Please
read this section carefully, especially if you are new to Vinyl Decal installations. Application
Paper
Application Paper is the Mask that we apply to your Decal that makes multiple
letters stay together. It is necessary for us to apply this mask to make Decals
ready for install. This Mask is either made of paper or plastic, depending on
the characteristics of the decal. Decal
This is the actual adhesive Decal that you have purchased. It is sandwiched between
the application paper and the backing at the time of purchase. The Decal is what
ends up installed to the surface. Backing
The Backing is the wax paper that is applied to the “sticky” side of
the decal. This Backing keeps the Decal from sticking to anything prior to install.
Surface
Compatibility:
The Surface must be a Hard, Flat, and Non- Porous. Installation to any other surfaces
is not recommended, unless you are an experienced Vinyl Installer. Special skills
are needed to deal with major body lines, complex curves, corrugated surfaces,
etc. We strongly suggest you wait at least 60 days after painting a surface before
applying any decal, because should you ever wish to remove the decal the paint
will come off with it if the paint is not properly cured before application. Surface
Temperature and Weather Conditions: Adequate
Surface Temperature and Weather Conditions are necessary before attempting to
install a Decal. -The
Surface Temperature must be between 60°F and 90°F, with 70°F to 80°F
being the ideal range.
-It can’t be Raining or even Drizzling. Decals
must be kept absolutely dry until installed.
-Try to avoid installing Decals
in Direct Sunlight. Surface Temperatures in Direct Sunlight often change rapidly
and are difficult to judge.
-Make sure there is No Wind present, Wind or Gusts
Will cause a problem. Cleaning
and Prepping Surface:
If surface is at all dirty, wash with soap and water rinse with water until there
is no more soap or soap residue. Make sure Surface is absolutely dry before proceeding
to next step. Thoroughly
wipe down the area of the Surface where Decal is to be applied with DZ Super Surface
Prep or alcohol. Glass cleaners or other ammonia-based products are not recommended
for this purpose, even with glass installations. Once
the surface is clean, installation may begin. A clean Surface will help to ensure
that your Decal will stay in place for both the short and long run.
We strongly suggest you wait at least 60 days after painting a surface before
applying any decal, because should you ever wish to remove the decal the paint
will come off with it if the paint is not properly cured before application.
Soapy
Water or Dry Application?
Most smaller decals can be put on without the use
of water.
If you decide to wet the surface first with soapy water:
mix
1 teaspoon of Dawn Dish Soap with one gallon of water, then mist the application
area prior to installation. Then follow
all other instructions.
Don't
forget the decal installation kit.
Installing
Decals using the Simple Method (Smaller Decals) 1)
Decide where you want your Decal to go. Tape it into position with small pieces
of masking tape along the top of the decal.
2) Make a mark on each end of
the Decal (See Below) with a Water Soluble Pencil Start the mark on the Application
Paper of the Decal, and end the mark on the Surface that you are installing to. 
3)
Remove the Decal, leaving the marks on the Install Surface. Remove and discard
the masking tape and backing at this time.
4) Keeping the Decal taut, line
up marks and adhere Decal. (The help of another person makes positioning much
easier.)
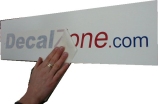
5) With the Application Paper still intact, Take a Squeegee and
apply the Lettering by pressing on the surface of the Application Paper. Using
even strokes, start at the middle of the letters, and work your way out. Carefully
remove Application Paper. The
Job is Done!
Don't
forget the decal installation kit.
Installing
Decals using the Hinge Method (Larger Decals)
 Figure 1.
 |
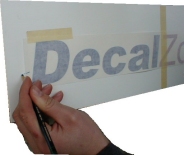
Figure 2. |
Soapy Water
or Dry Application?
Most smaller decals can be put on without the use of water.
If you decide to wet the surface first with soapy water:
mix 1 teaspoon
of Dawn Dish Soap with one gallon of water, then mist the application area prior
to installation. Then follow
all other instructions.1)
Decide where you want your Decal to go. Tape it into position with small pieces
of masking tape along the top of the decal, and a piece of masking tape vertically
at the center of the decal (Figure 1), this will soon be used as a “Hinge”.
We will refer to either side of the hinge as Side A and Side B.
2) Make a
mark on each end of the Decal with a Water Soluble Pencil (See Figure 2). Start
the mark on the Application Paper of the decal, and end the mark on the surface
that you are installing to.

Figure 3. | 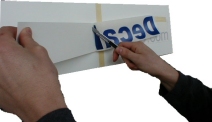 Figure 4.
 |
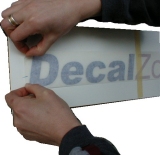 Figure 5.
 |
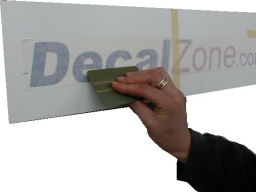 Figure 6.
 |
Installing
Side A:
3) (See Figure 3) Remove the top piece of masking tape from side A. Leaving the
center piece of masking tape intact, Lift Side A of the decal in a “Hinge”
motion (Figure 3).
4) Cut the Backing Paper at the hinge, (Figure 4) leaving
only the Application Paper and Lettering on side A.
5) Now, lower the hinge
so that the mark on the application paper and the mark on surface are aligned
(Figure 5) With the Application Paper still intact, Take a Squeegee and apply
the Lettering by pressing on the surface of the Application Paper. Using even
strokes, start at the middle of the letters, and work your way out. Side A of
your decal is now installed!
Do
not remove the Application Paper from side A yet! Installing
Side B:
6) Now, Leaving all Application Tape Intact, remove all masking tape and backing.
Repeat Steps 3-6 on side B.
7) Carefully remove Application Paper. The
job is done!
Don't
forget the decal installation kit.
Dealing
With Bubbles
You will probably end up with some bubbles in your decal job. Small bubbles will
go away in time (the film breathes, and will flatten out after a few weeks at
an appropriate temperature). If you want to work on the bubbles immediately, apply
moderate heat, then poke them with a pin, pressing the film down with your
thumb immediately afterwards. Have patience though, the film will lay flat on
it’s own in time unless the bubbles are unusually large. Storage
Your decals must be kept clean, dry, and laid out on a flat surface. If storage
is to be longer than 1 year, It is recommended that they be kept in an airtight
container or bag. If you regularly use decals, make sure to rotate your stock. Decal
Removal
Decal removal can vary in difficulty, depending on a few things; the quality of
the film to be removed, how long it’s been on, if it’s weather-beaten,
etc. Move along the decal with a hair dryer or heat gun, while at the same time
picking the letters or striping off as you go.
If there is glue left behind,
clean it up with some petroleum naphtha (available at your local hardware store)
applied to a rag.
|